
 LinkBack URL
 About LinkBacks
Computer Vision: YOLO Custom Object Detection with Colab GPU
Video: .mp4 (1280x720, 30 fps(r)) | Audio: aac, 44100 Hz, 2ch | Size: 2.65 GB
Genre: eLearning Video | Duration: 42 lectures (4 hour, 12 mins) | Language: English
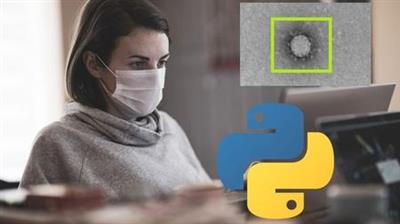
YOLO: Pre-Trained Coco Dataset and Custom Trained Coronavirus Object Detection Model with Google Colab GPU Training.
What you'll learn
Python based YOLO Object Detection using Pre-trained Dataset Models as well as Custom Trained Dataset Models. Case study of coronavirus detector using YOLO
Requirements
A decent configuration computer (preferably Windows) and an enthusiasm to dive into the world Image and Object Recognition using Python
Description
Hi There!
welcome to my new course 'YOLO Custom Object Detection Quick Starter with Python'. This is the fourth course from my Computer Vision series.
As you know Object Detection is the most used applications of Computer Vision, in which the computer will be able to recognize and classify objects inside an image.
We will be specifically focusing on (YOLO), You only look once which is an effective real-time object recognition algorithm which is featured in Darknet, an open source neural network framework
This course is equally divided into two halves. The first half will deal with object recognition using a predefined dataset called the coco dataset which can classify 80 classes of objects. And the second half we will try to create our own custom dataset and train the YOLO model. We will try to create our own coronavirus detection model.
Let's now see the list of interesting topics that are included in this course.
At first we will have an introductory theory session about YOLO Object Detection system.
After that, we are ready to proceed with preparing our computer for python coding by downloading and installing the anaconda package and will check and see if everything is installed fine.
Most of you may not be coming from a python based programming background. The next few sessions and examples will help you get the basic python programming skill to proceed with the sessions included in this course. The topics include Python assignment, flow-control, functions and data structures.
Then we will install install OpenCV, which is the Open Source Computer Vision library in Python.
Then we will have an introduction to Convolutional Neural Networks , its working and the different steps involved.
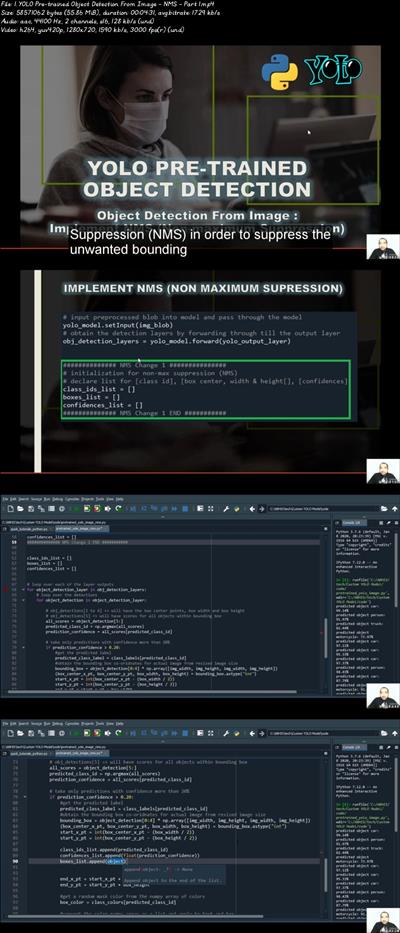
Now we will proceed with the part 1 that involves Object Detection and Recognition using YOLO pre-trained model. we will have an overview about the yolo model in the next session and then we will implement yolo object detection from a single image.
Often YOLO gives back more than one successful detection for a single object in an image. This can be fixed using
a technique called as NMS or Non Maxima Suppression. We will implement that in our next session.
And using that as the base, we will try the yolo model for object detection from a real time webcam video and we will check the performance. Later we will use it for object recognition from the pre-saved video file.
Then we will proceed with part 2 of the course in which we will attempt to train a darknet YOLO model. A model which can detect coronavirus from an electron microscope image or video output.
Before we proceed with the implementation, we will discuss the pros and cons of using a pre-trained dataset model and a custom dataset trained model. Also about the free GPU offered by google colab and its features.
In the next session we will start with phase 1 of our custom model in which we will do the preparation steps to implement custom model. We will at first download the darknet source from github and prepare it. We will then download the weight files required for both testing and training. And then we will edit the required configurations files to make it ready for our custom coronavirus detector.
In the second phase for our custom model, we will start collecting the required data to train the model. We will collect coronavirus images from the internet as much as we could and organize them into folder. Then we will label or annotate the coronavirus object inside these images using an opensource annotation tool called labelImg. Then we will split the gathered dataset, 80% for training and 20% for testing. And finally will edit the prepare the files with the location of training and testing datasets.
Now that we have all our files ready, in our third phase, we will zip and upload them into google drive. After that we will create a google colab notebook and configure the colab runtime to use the fast, powerful, yet free GPU service provided by google. Then we will mount our google drive to our colab runtime and unzip the darknet zip we uploaded.
Sometimes files edited in non unix environments may be having problems when compiling the darknet. We have to convert the encoding from dos to unix as our next step. Then we will complile the darknet framework source code and proceed with testing the darknet framework with a sample image in our fourth phase.
The free GPU based runtime provided by google colab is volatile. It will get reset every 12 hours. So we need to save our weights periodically during training to our google drive which is a permanent storage. So in our phase five, we will link a backup folder in google drive to the colab runtime.
Finally in our phase 6, we are ready to proceed with training our custom coronavirus model. We will keep on monitoring the loss for every iteration or epoch as we call it in nerual network terms. Our model will automatically save the weights every 100th epoch securely to our google drive backup folder.
We can see a continues decrease in the loss values as we go through the epoch. And after many number of iterations, our model will come into a convergence or flatline state in which there is no further improvement in loss. at that time we will obtain a final weight
Later we will use that weight to do prediction for an image that contains coronavirus in it. We can see that our model clearly detects objects. We will even try this with a video file also.
We cannot claim that its a fully fledged flawless production ready coronavirus detection model. There is still room for improvement. But anyway, by building this custom model, we came all the way through the steps and process of making a custom yolo model which will be a great and valuable experience for you.
And then later in a quick session, we will also discuss few other case studies in which we can implement a custom trained YOLO model, the changes we may need to make for training those models etc.
That's all about the topics which are currently included in this quick course. The code, images and weights used in this course has been uploaded and shared in a folder. I will include the link to download them in the last session or the resource section of this course. You are free to use the code in your projects with no questions asked.
Also after completing this course, you will be provided with a course completion certificate which will add value to your portfolio.
So that's all for now, see you soon in the class room. Happy learning and have a great time.
Who this course is for:
Beginners or who those wants to start with Python based Object Recognition and want to develop custom object detection models
Download link:Kod:rapidgator_net: https://rapidgator.net/file/76b989d84778490e149a932fc7f007a1/4t3qx.Computer.Vision.YOLO.Custom.Object.Detection.with.Colab.GPU.part1.rar.html https://rapidgator.net/file/63b48c5a73adac85ba793525bee44d55/4t3qx.Computer.Vision.YOLO.Custom.Object.Detection.with.Colab.GPU.part2.rar.html https://rapidgator.net/file/cfa4a64bbfc8016184852564a7f4998f/4t3qx.Computer.Vision.YOLO.Custom.Object.Detection.with.Colab.GPU.part3.rar.html nitroflare_com: https://nitroflare.com/view/B5034DF9430E4A3/4t3qx.Computer.Vision.YOLO.Custom.Object.Detection.with.Colab.GPU.part1.rar https://nitroflare.com/view/94B35DEA7291067/4t3qx.Computer.Vision.YOLO.Custom.Object.Detection.with.Colab.GPU.part2.rar https://nitroflare.com/view/82EC194EC481114/4t3qx.Computer.Vision.YOLO.Custom.Object.Detection.with.Colab.GPU.part3.rarLinks are Interchangeable - No Password - Single Extraction

1 sonuçtan 1 ile 1 arası
Threaded View
-
21.06.2020 #1Üye


")
- Üyelik tarihi
- 20.08.2016
- Mesajlar
- 147.735
- Konular
- 0
- Bölümü
- Bilgisayar
- Cinsiyet
- Kadın
- Tecrübe Puanı
- 157
Computer Vision: YOLO Custom Object Detection with Colab GPU


 Alıntı
Konu Bilgileri
Users Browsing this Thread
Şu an 1 kullanıcı var. (0 üye ve 1 konuk)

Konuyu Favori Sayfanıza Ekleyin